Redux Toolkit Tutorial
In this article, you will learn practically how redux works using react and redux toolkit
In this article we will be covering all the basic stuff you need to learn to get started with redux tookit in react.
What is state in React Js
The state is a built-in React object that is used to contain data or information about the component.
Why do we need redux ?
Redux allows you to manage your app’s state in a single place and keep changes in your app more predictable and traceable.
What Pain does redux solves
- Redux is a global state
- Redux is not necessary for every project.
- You may need Redux if you don’t want to do props drilling (passing props too deep).
- If you are still confused about Redux, just think about the React state. The only difference is you can access the state from anywhere.
Watch Video instead
Let’s Build an Redux App
Well to make interesting , we will learn redux toolkit along with making a simple counter application.
Let’s start.
Step 1 – Install Redux and Redux Toolkit package in an react app
Thankgod✌️ we only need two packages now , so go ahead and install these two.
npm install --save react-redux @reduxjs/toolkitStep 2 – Create a global store
Create src/app/store.js –
import { configureStore } from "@reduxjs/toolkit";

export const store = configureStore({
  reducer: {},
});
configureStore accepts a single object rather that multiple function arguments. It’s because under the hood, the store has been configured to allow using the Redux DevTools Extension and has had some Redux middleware included by default.
Step 3 – Providing store to complete react app
This will provide store globally.
Go to src/index.js :
import React from "react";
import ReactDOM from "react-dom/client";
import "./index.css";
import App from "./App";
import { store } from "./app/store";
import { Provider } from "react-redux";

const root = ReactDOM.createRoot(document.getElementById("root"));
root.render(
  <Provider store={store}>
    <App />
  </Provider>
);
Provider wraps the App and the whole application has access to redux store.
Now check your redux dev tool
Step 4 – Now lets create a slice
A function that accepts an initial state, an object of reducer functions, and a “slice name”, and automatically generates action creators and action types that correspond to the reducers and state.
Internally, it uses createAction and createReducer, so you may also use Immer to write "mutating" immutable updates.Create a slice – src/features/counter/counterSlice.js
import { createSlice } from "@reduxjs/toolkit";

const initialState = { value: 0 };

export const counterSlice = createSlice({
  name: "counter",
  initialState,
  reducers: {
    increment: (state) => {
      state.value = state.value + 1;
    },
    decrement: (state) => {
      state.value = state.value - 1;
    },
    incrementByValue: (state, action) => {
      state.value = state.value + action.payload;
    },
    incrementByTypedValue: (state, action) => {
      state.value = state.value + action.payload;
    },
  },
});

export const { increment, decrement } = counterSlice.actions;

export default counterSlice.reducer;
Step 5 – Add Slice Reducers to the Store
import { configureStore } from "@reduxjs/toolkit";
import counterRedcuer from "../features/counter/counterSlice";

export const store = configureStore({
  reducer: { counter: counterRedcuer },
});
Step 6 – Implementing useSelector and useDispatch in React Components
Components/Counter.js
import React from "react";
import { useSelector, useDispatch } from "react-redux";
import { decrement, increment } from "../features/counter/counterSlice";

export default function Counter() {
  const count = useSelector((c) => c.counter.value);
  const dispatch = useDispatch();

  return (
    <>
      <div
        style={{
          display: "flex",
          flexDirection: "column",
          justifyContent: "center",
          width: "40%",
          alignItems: "center",
        }}
      >
        <button onClick={() => dispatch(increment())}>Increment</button>
        <span>{count}</span>
        <button onClick={() => dispatch(decrement())}>Decrement</button>
      </div>
    </>
  );
}
Conclusion
Frankly , redux is more of a flow which you need to follow instead of trying hard to understand each and every logic .
Final Summary –
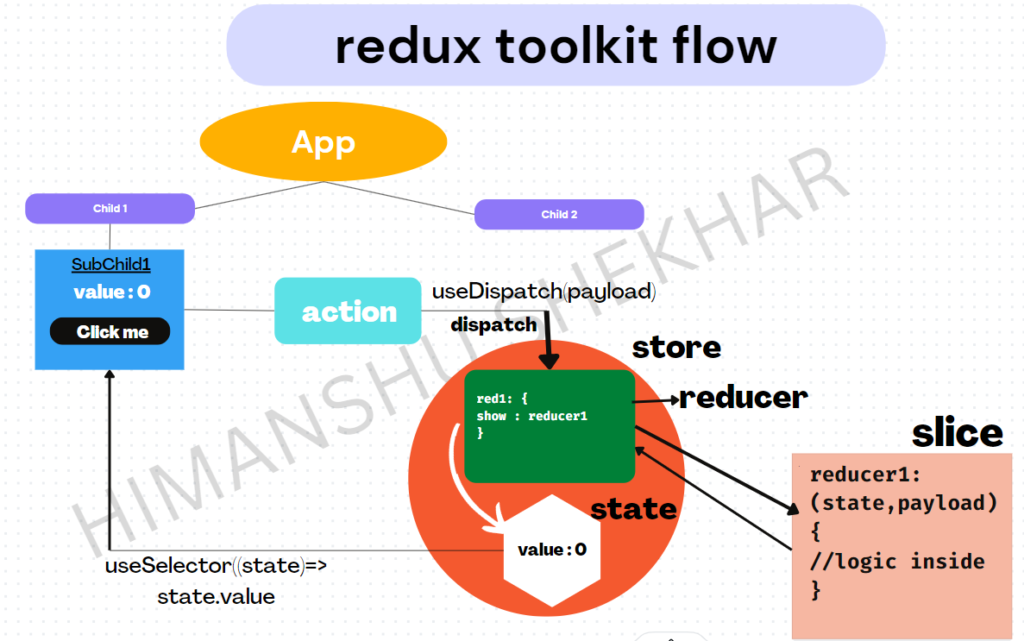
When we click on the button, we call a function , which in reducer term means that we have dispatched an action. Now that dispatched action will call a reducer function , where all the logic’s are written , and this reducer function will update the slice of the redux store
Lets revise all the steps again –
- Step 1 – Install the redux and react-redux package
- Step 2 – Create a store
- Step 3 – Providing store globally
- Step 4 – Creating slices (i.e reducers) , where all the major logics are performed
- Step 5 – Receiving action from UI (using useDispatch hook) and receiving data from global store to fronted (using useSelector hook).
Hope you guys found the article helpful.
[…] Well, I have explained this in-depth, in my preview article, do check it out. Click here […]
import counterRedcuer from “../features/counter/counterSlice”;
counterReducer kaise aya counterSlice se
import { createSlice } from “@reduxjs/toolkit”;
const initialState = { value: 0 };
export const counterSlice = createSlice({
name: “counter”,
initialState,
reducers: {
increment: (state) => {
state.value = state.value + 1;
},
decrement: (state) => {
state.value = state.value – 1;
},
incrementByValue: (state, action) => {
state.value = state.value + action.payload;
},
incrementByTypedValue: (state, action) => {
state.value = state.value + action.payload;
},
},
});
export const { increment, decrement } = counterSlice.actions;
export default counterSlice.reducer;
Usefull thanks alot
[…] short , if you are done with redux toolkit , this is your next step to learn, go for […]
Very Helpful . Thanks for the such a Good documentation and lecture.
Very Useful
one of the best video to learn RTK