Firebase updates are never-ending. The recent firebase update to version 10, but the actual logic or the core logic behind the scene is almost the same.
That’s why this article will be relevant even if the version changes in future. So go ahead and read it.
Introduction
In this article, we are going to build an image card layout, where user can
What is firebase
Firebase is a platform developed by Google that provides various backend services for building and running web and mobile applications
Some features of Firebase are :
- Realtime database
- Authentication
- Cloud firestorm
- Hosting
- Analytics
- Performance monitoring
- Remote config
Create a Firebase project
To create a firebase project, login into your google account and then –
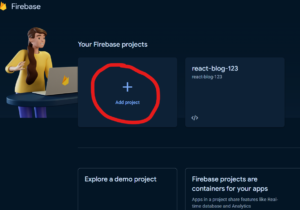
Go to Firebase console . Add your project name and click continue.
Hurray! Firebase project is successfully created.

Setting up the firestore
Firestore is a cloud-hosted NoSQL database that provided a powerful and easy-to-use solution for storing and syncing data in real time
Let’s start from setting up the firebase first –
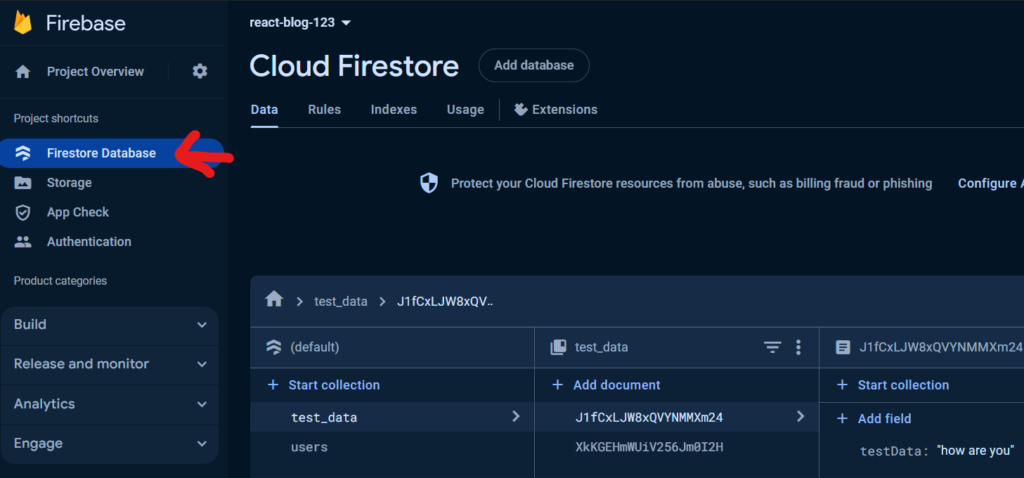
Click on create database , choose test mode and continue.
Finally, an empty database will be created.

Setup React Application and Integrate firebase
Create a folder and run vite command to intiate your react app. Also add firebase package to your application.
npm create vite@latest project_name
npm install
npm install firebase
npm run dev
Now , got to firebase console , Project overview and then to project settings.
// Import the functions you need from the SDKs you need
import { initializeApp } from "firebase/app";
// TODO: Add SDKs for Firebase products that you want to use
// https://firebase.google.com/docs/web/setup#available-libraries

// Your web app's Firebase configuration
const firebaseConfig = {
  apiKey: "",
  authDomain: "",
  projectId: "react-blog-123",
  storageBucket: "",
  messagingSenderId: "",
  appId: ""
};

// Initialize Firebase
const app = initializeApp(firebaseConfig);
Now add this configuration to your react app.
Create one file : src/components/firebase/firebaseConfig.jsx
firebaseConfig.jsx
// Import the functions you need from the SDKs you need

import { initializeApp } from "firebase/app";
import { getAuth } from "firebase/auth";
import { getFirestore } from "firebase/firestore";
import { getStorage } from "firebase/storage";

// Your web app's Firebase configuration
const firebaseConfig = {
  apiKey: "add yourr api key",
  authDomain: "xxxxxxx",
  projectId: "xxxxxx",
  storageBucket: "xxxxxxx",
  messagingSenderId: "xxxxx",
  appId: "xxxxxxxx",
};

// Initialize Firebase
const app = initializeApp(firebaseConfig);

//Initialize firestore
const db = getFirestore(app);
export const storage = getStorage();

//Authentication (not required for this article)
export const auth = getAuth(app);

export default db;
Add a card (Create Operation)
Create a file under src/components/CreateUpdate.jsx
- Create a form
- Add name, email and fileUrl as state
- import db instance , collection that contains documents, which are JSON objects that contain fields and values , addDoc method that allows you to add a new document to a collection in your Firestore database.
- handleAdd function to add the data into documents
Imports
import db, { storage } from "../../firebase/firebaseConfig";
import { ref, getDownloadURL, uploadBytesResumable } from "firebase/storage";
Creating a form
const [fName, setFName] = useState();
  const [fEmail, setFEmail] = useState();
  const [fileUrl, setFileUrl] = useState();
 const [loading, setLoading] = useState(false);


<div className="App">
      <form>
        {loading && <span>Loading...</span>}
        <div>
          <label htmlFor="name">Name</label>
          <input
            type="text"
            name="name"
            value={fName}
            onChange={(e) => setFName(e.target.value)}
          />
        </div>
        <div>
          <label htmlFor="email">Email</label>
          <input
            type="email"
            name="email"
            value={fEmail}
            onChange={(e) => setFEmail(e.target.value)}
          />
        </div>
        <div>
          {fileUrl && (
            <div>
              <img src={fileUrl} alt={fName} width={100} />
            </div>
          )}
          <label htmlFor="image">Upload Image</label>
          <input
            type="file"
            name="image"
            // defaultValue={fileUrl}
            value={fileUrl}
            onChange={(e) => handleUpload(e)}
          />
        </div>
          <button type="submit" onClick={submitHandler}>
            Add
          </button>
      </form>
    </div>
Adding handleUpload function to upload image in firebase
- ref – A Firebase reference represents a particular location in your Database and can be used for reading or writing data to that Database location.
- storage – Firebase Storage is one of the core features to the Firebase development platform that lets you upload and share rich content such as images, files, and videos into your apps
- uploadBytesResumable – Top-level function of firebase to upload files while monitoring progress. uploadBytes() also does exactly the same thing.
- getDownloadURL – Get the download URL for a file by calling the getDownloadURL().
  const handleUpload = async (e) => {
    setLoading(true);
    const file = e.target.files[0];
    try {
      const imageRef = ref(storage, `image/${v4()}`);
      await uploadBytesResumable(imageRef, file);
      const url = await getDownloadURL(imageRef);
      setFileUrl(url);
    } catch (error) {
      console.log(error);
    } finally {
      setLoading(false);
    }
  };
Adding addHandler logic
 const submitHandler = async (e) => {
    e.preventDefault();
    let data = {
      _id: new Date().getUTCMilliseconds(),
      fName: fName,
      fEmail: fEmail,
      fileUrl: fileUrl,
      created: Timestamp.now(),
    };
    const ref = collection(db, "users"); // Here Firebase creates database automatically

    //pending to add check if data exists
    try {
      await addDoc(ref, data);
    } catch (err) {
      console.log(err);
    }
    setIsEdit(false);
    setFName("");
    setFEmail("");
    navigate("/");
  };
Addind routing to the application
npm i react-router-domCreate component for read and update , and add routing to the App.jsx
 <BrowserRouter>
      <Header />
      <Routes>
        <Route exact path="/" element={<Read/>} />
        <Route path="/create" element={<CreateUpdate />} />
        <Route path="/edit/:id" element={<CreateUpdate />} />
        <Route path="/auth" element={<LoginSignup />} />
      </Routes>
    </BrowserRouter>
Get all the card (Read Operation)
Create a component to read the data – src/components/Read.jsx
Create a function “fetchData” to fetch all the data from Firestore
- getDocs – function from the Firebase Firestore SDK to retrieve a snapshot of the documents in the “users” collection in the Firestore database
- doc.data() : get each data from the document
  const [userData, setUserData] = useState([]);

  // fetch all data from firebase
  const fetchData = async () => {
    const snapshot = await getDocs(collection(db, "users"));
    const data = snapshot.docs.map((doc) => {
      return { ...doc.data(), id: doc.id };
    });
    setUserData(data);
  };

 useEffect(() => {
    fetchData();
  }, []);
Now loop over each data and render it on the UI
return (
    <>
      {user.email}
      <div className="container">
        <h3>Show firebase db data</h3>
        <div className="main_card">
          {userData?.map((item) => (
            <div key={item.id} className="card">
              <img src={item?.fileUrl || "https://rb.gy/azp3z8"} width={250} />
              <h2>{item.fName}</h2>
              <div>
                <button>Delete</button>
                  <button>Edit</button>
              </div>
            </div>
          ))}
        </div>
      </div>
    </>
  );
Remove a single Card (Delete Operation)
Create a function “deleteData” to remove each document
  const deleteData = async (id) => {
    try {
      await deleteDoc(doc(db, "users", id));
      console.log("Entire Document has been deleted successfully.");
      await fetchData();
    } catch (error) {
      console.log(error);
    }
  };
Adding the function to the button element
<button onClick={() => deleteData(item.id)}>Delete</button>
Remove All Card
Update a card (Update Operation)
We are using the same component CreateUpdate.jsx for add and edit
Add Routing to CreateUpdate.jsx page
<Route path="/edit/:id" element={<CreateUpdate />} />Logic to check whether the page is a Create or Update Page
import { useParams } from "react-router-dom";

//get the id from url
const { id } = useParams();

useEffect(() => {
    if (!id) {
      setIsEdit(false);
      setFName("");
      setFEmail("");
      setFileUrl("");
    } else {
      setIsEdit(true);
      fetchSingleData();
    }
  }, [id]);
Prefill all the input field
//fetch single data with document
const fetchSingleData = async () => {
    try {
      const docRef = doc(db, "users", id);
      const docSnap = await getDoc(docRef);
      console.log(docSnap.data());
      setFName(docSnap.data().fName);
      setFEmail(docSnap.data().fEmail);
      setFileUrl(docSnap.data().fileUrl);
    } catch (error) {
      console.log(error);
    }
  };

//Form
 <div className="w-50 mx-auto">
      <h2>{isEdit ? "Update a card" : "Add a card"} </h2>
      {isLoading && (
        <div className="alert alert-secondary" role="alert">
          Wait, file is uploading
        </div>
      )}
      <form>
        <div className="mb-3">
          <label htmlFor="input_name" className="form-label">
            Enter Name
          </label>
          <input
            type="name"
            name="input_name"
            className="form-control"
            value={fName}
            onChange={(e) => setFName(e.target.value)}
          />
        </div>
        <div className="mb-3">
          <label htmlFor="input_email" className="form-label">
            Email address
          </label>
          <input
            type="email"
            className="form-control"
            value={fEmail}
            name="input_email"
            onChange={(e) => setFEmail(e.target.value)}
          />
        </div>
        <div className="mb-3">
          <label htmlFor="input_file" className="form-label">
            Add image
          </label>
          {fileUrl && (
            <div>
              <img
                className="m-2 rounded"
                src={fileUrl}
                alt={fName}
                width={100}
              />
            </div>
          )}
          <input
            type="file"
            className="form-control"
            name="input_file"
            // value={fileUrl}
            onChange={(e) => handleUpload(e)}
          />
        </div>

        {isEdit ? (
          <button
            type="submit"
            className={`btn btn-secondary ${isLoading ? "disabled" : ""}`}
            onClick={handleEdit}
          >
            Update
          </button>
        ) : (
          <button
            type="submit"
            className={`btn btn-primary ${isLoading ? "disabled" : ""}`}
            onClick={handleAdd}
          >
            Add
          </button>
        )}
      </form>
    </div>
Finally, the update logic of firebase
updateDoc – To update a document in Firebase Firestore, you can use the updateDoc method from the Firebase Firestore SDK
doc – In Firebase, the doc() function is used to reference a specific document within a Firestore database.
  const handleEdit = async (e) => {
    e.preventDefault();

    try {
      await updateDoc(doc(db, "users", id), {
        fName: fName,
        fEmail: fEmail,
        fileUrl: fileUrl,
      });
      setFName("");
      setFEmail("");
      setFileUrl("");
      navigate("/");
    } catch (error) {
      console.log(error);
    }
  };


//Button click
 <button
            type="submit"
            className={`btn btn-secondary ${isLoading ? "disabled" : ""}`}
            onClick={handleEdit}
          >
            Update
          </button>
Conclusion & Code
In the article, we have seen how we can perform a crud operation step by step using react as frontend and firebase as backend.
Grab the code from link below