Full Stack application using Node Js, Express Js, SQL, Bootstrap, and Java Script
You might have seen many blogs and videos explaining about creating an application using MERN, MEAN, or some other framework. But what if you want to create an application without using any frontend framework or without using MongoDB. Then in this case the resources on the internet are limited, or frankly very very less.
And that’s why I have curated this article where I am going to show you set by step (with code) how you can create a simple full tack application by using –
- Node JS , Express JS (backend)
- SQL (for database)
- Java Script , Boostrap 5 (for frontend)
Before reading the article further, you need to have a basic understanding of the above-mentioned tech stacks.
Pre-requisite
- Install node js
Go to cmd and type “node -v” to check if it’s installed or not.
- Install VS code editor
- Basic understanding of Node JS , Java Script , HTML and CSS
Watch video instead
Now that is out of the way, let’s get started
Step 1 – Initiate a node js server
Create a folder and open VS code inside it and type the below command
npm initNow you might be seeing a package.json file created.
Good! Now let’s install some important dependencies
npm install mysql express nodemon dotenv cors body-parser ejs- mysql – MySQL module helps in creating connections between Node js server with MySQL database.
- express – Express.js is a web application framework for Node.js. It provides various features that make web application development fast and easy which otherwise takes more time using only Node.js
- nodemon – It helps in automatic server start
- cors– resolving the cross-browser issue
- body-parser – parsing the request coming from body
- ejs – templating engine
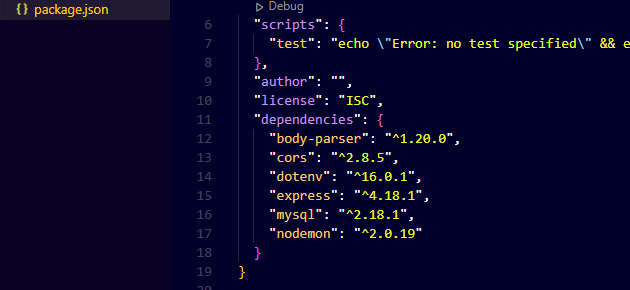
Now cross-check in your package.json file whether all the dependencies are installed or not. Once it’s installed, lets go to the second step.
Step 2 – Create your first API
API basically means a set of function/logic/rules create and which can be accessed by an URL. (the definition is not complete, but for now let’s manage with this)
While doing npm init, either index.js or server.js must have been created. If not, go ahead and create one.
Let’s start writing some code now.
server.js
const express = require("express"); //express package initiated
const app = express(); // express instance has been created and will be access by app variable

app.get("/", (req, res) => {
  res.send("API running");
});

app.listen(3000);
Also, don’t forget to add nodemon in package.json file
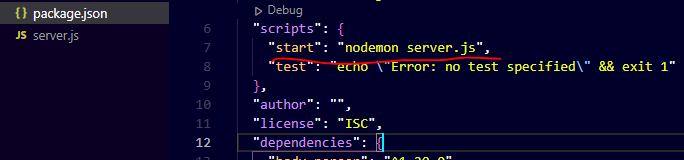
Now go ahead to our vs code terminal and type
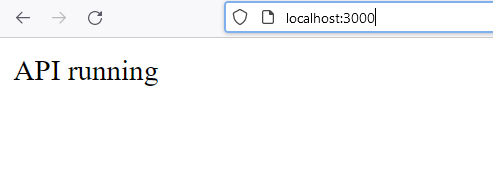
npm startGo to browser and type “http://localhost:3000/”
And Boom! you have created your first API.
Step 3 – Create a database connection
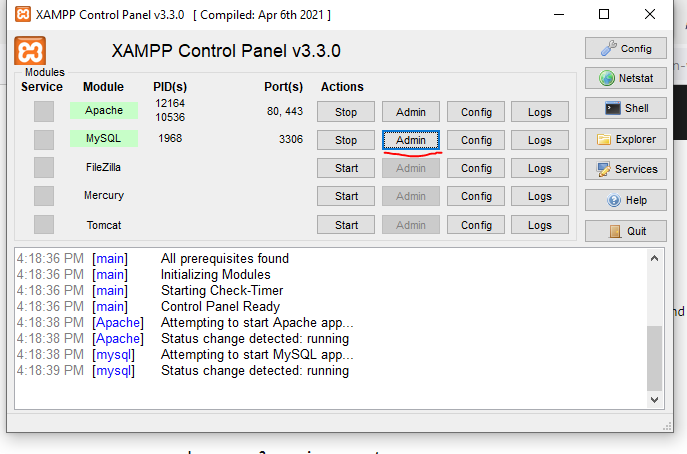
Now, for databases, we are using MySQL. To run MySQL server in your local we need to install xampp
- Install Xampp
- Start MySQL and apache server
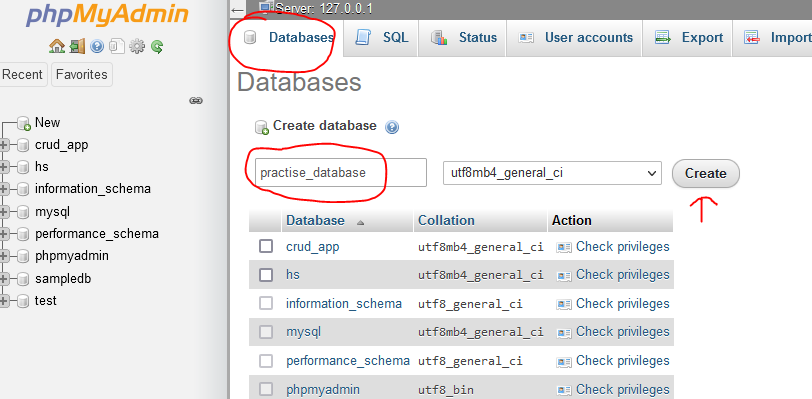
- Go to “http://localhost/phpmyadmin/”
Now go ahead and create a database.
Eg: database name – practise_database
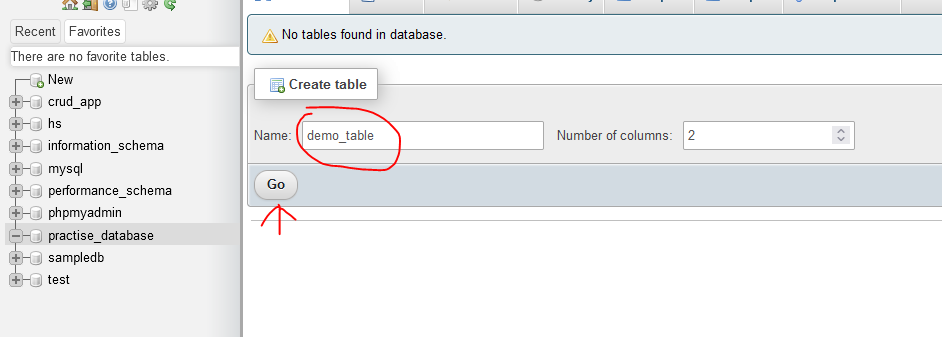
Now that database is created, you need to create a table inside the database
Eg – table name – demo_table
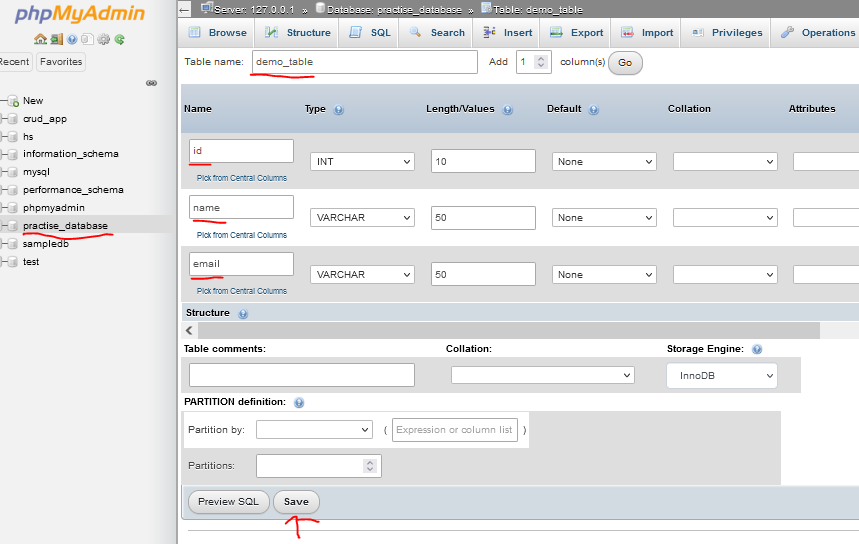
Now add a column in the table and create a table structure
Eg -
col 1 - id
col 2 - name
col 3 - email
Step 4 – Connecting database with node backend(using .env file)
Create a .env file
.env file
PORT = 4000
HOST = localhost
USER = root
PASSWORD =
TABLE = demo
DB_PORT = 3306
DATABASE = practise_database
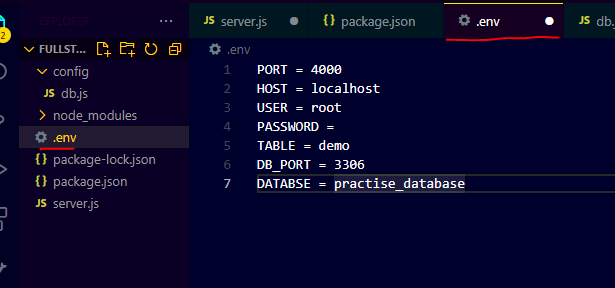
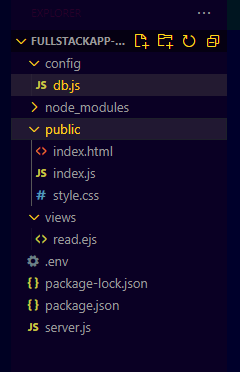
Note - The above USER and PASSWORD are by default. You can go to priviledge section of myPhpAdmin and change the password accordingly.Create a new folder with the name “config” and a new file with the name “db.js”
Path – crud-app/server/config/db.js
const dotenv = require("dotenv");
const mysql = require("mysql");
dotenv.config();

const connection = mysql.createConnection({
  host: process.env.HOST,
  user: process.env.USER,
  password: process.env.PASSWORD,
  database: process.env.DATABASE,
});

connection.connect((error) => {
  if (error) return console.log(error);
  console.log("connection successfull");
});

module.exports = connection;
Now update your server.js file
const express = require("express"); //express package initiated
const app = express(); // express instance has been created and will be access by app variable
const cors = require("cors");
const dotenv = require("dotenv");

const connection = require("./config/db");
dotenv.config();

app.use(cors());
app.use(express.urlencoded({ extended: false }));
app.use(express.json());

app.get("/", (req, res) => {
  res.send("API running");
});


app.listen(process.env.PORT, function (err) {
  if (err) console.log(err);
  console.log(`listening to port ${process.env.PORT}`);
});
Step 5 – Let’s setup frontend now
Enough of the backend, let’s create some UI now.
Create a folder “public” and file name “index.html”- crud-app/server/public/index.html
index.html
<!DOCTYPE html>
<html lang="en">
<head>
<meta charset="UTF-8" />
<meta http-equiv="X-UA-Compatible" content="IE=edge" />
<meta name="viewport" content="width=device-width, initial-scale=1.0" />
<link
href="https://cdn.jsdelivr.net/npm/bootstrap@5.2.0/dist/css/bootstrap.min.css"
rel="stylesheet"
integrity="sha384-gH2yIJqKdNHPEq0n4Mqa/HGKIhSkIHeL5AyhkYV8i59U5AR6csBvApHHNl/vI1Bx"
crossorigin="anonymous"
/>
<link rel="stylesheet" href="style.css" />
<title>Document</title>
</head>
<body>
<div class="container my-2">
<h1 class="h1 text-center">Fill the data</h1>
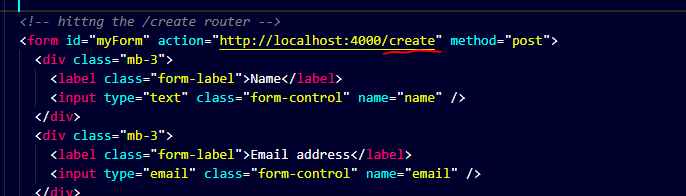
<form id="myForm" action="http://localhost:4000/create" method="post">
<div class="mb-3">
<label class="form-label">Name</label>
<input type="text" class="form-control" name="name" />
</div>
<div class="mb-3">
<label class="form-label">Email address</label>
<input type="email" class="form-control" name="email" />
</div>
<button type="submit" class="btn btn-primary">Submit</button>
</form>
</div>
</body>
</html>
Now that we have created our form UI, let’s render it and show it to the browser (This is noting but read operation. Anyways we will be seeing read in details as you proceed in the article)
Now we need to create one router with “/” and render an HTML file which is index.html in our case
server.js
const express = require("express"); //express package initiated
const app = express(); // express instance has been created and will be access by app variable
const cors = require("cors");
const dotenv = require("dotenv");

const connection = require("./config/db");
dotenv.config();

app.use(cors());
app.use(express.urlencoded({ extended: false }));
app.use(express.json());


//read file on UI
app.get("/", (req, res) => {
  res.redirect("/index.html");
});


app.listen(process.env.PORT, function (err) {
  if (err) console.log(err);
  console.log(`listening to port ${process.env.PORT}`);
});
Now go to http://localhost:4000 and BOOM our UI is rendered.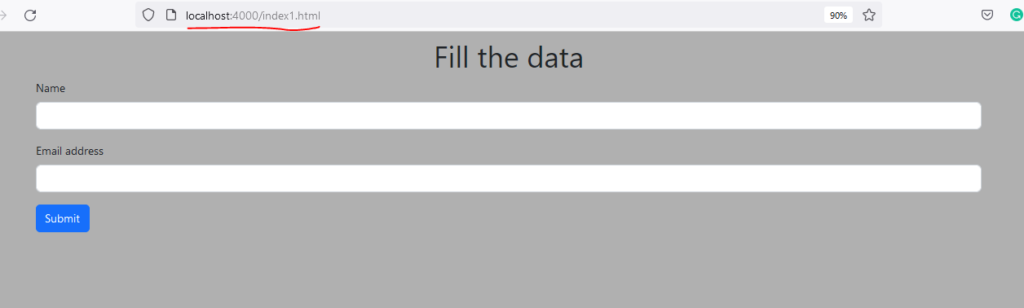
Now before you start having confusion between the below 3, read the difference now itself.
res.render()
Render means you are collecting some information through a data set. means you go to Mumbai and ask for some good places to explore that is data rendering. and in computer terms, you set a function to get the location of a particular user when he comes to a particular page. then this is the data rendering of the location
res.redirect()
Redirect means you are sending someone to a particular position. for example, if you are going to Pune to Mumbai then you are redirected to Pune to Mumbai. in computer terms if you click on any link then it will redirect you on a specific page. that is called redirect.
res.sendFile()
The sendfile method, on the other hand, simply sends a given file to the client, regardless of the type and contents of the file
Step 6: Create Operation
So now , our aim is when the user enter name and email and prsses on submit button , we need do do 3 things –
- Hit the router in the server.js file
- Save the data to database
- Redirect user to another page where use can see all the entried.
Well , the below code will do all the 3 jobs –
//create
app.post("/create", (req, res) => {
  console.log(req.body.name);
  var name = req.body.name;
  var email = req.body.email;
  try {
    connection.query(
      "INSERT into demo123 (name,email) values(?,?)",  //2. saving in database
      [name, email],
      function (err, result) {
        if (err) {
          console.log(err);
        } else {
          // res.json({ result });
          res.redirect("/data");  //3. Redirect user to the new page
        }
      }
    );
  } catch (err) {
    res.send(err);
  }
});
Final server.js
const express = require("express"); //express package initiated
const app = express(); // express instance has been created and will be access by app variable
const cors = require("cors");
const dotenv = require("dotenv");
var bodyParser = require("body-parser");
const connection = require("./config/db.js");

dotenv.config();
app.use(bodyParser.urlencoded({ extended: true }));
app.set("view engine", "ejs");
app.use(cors());
app.use(express.json());
app.use(express.static(__dirname + "/public"));
app.use(express.static(__dirname + "/views"));

//reading the form
app.get("/", (req, res) => {
  res.redirect("/index1.html");
});


//create
app.post("/create", (req, res) => {
  console.log(req.body.name);
  var name = req.body.name;
  var email = req.body.email;
  try {
    connection.query(
      "INSERT into demo123 (name,email) values(?,?)",
      [name, email],
      function (err, result) {
        if (err) {
          console.log(err);
        } else {
          // res.json({ result });
          res.redirect("/data");
        }
      }
    );
  } catch (err) {
    res.send(err);
  }
});

app.listen(process.env.PORT || 3000, function (err) {
  if (err) console.log(err);
  console.log(`listening to port ${process.env.PORT}`);
});
Step 7 – Read Operation
Now once us has submitted the form in the database , we need to redirect the user to a page where they can see the data , they have entered, right ?
It means , were need to dynamically add value to an HTML page , and that is where templating engine comes into play.
Now their are many templating engine like HUF, haml, hbs, ejs ,and so one , but in this article we are going to use ejs templating engine.
Keeping the article length in mind, please click on the hyperlink and read more about templating engine yourself.
In short -
use this to
 <% write java script insude me %>
and this
<%- %> or <%= %> to wrtite HTML string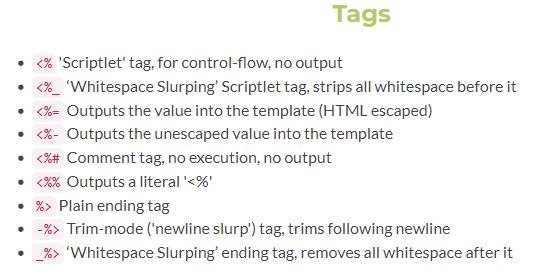
Let’s get started.
Before creating ejs file, we need to create a read operation router which will be hit when create operation router has done its job and send data to ejs file. Thr templating engine will be consuming data and displaying on the UI simultaneously.
Din’t understood , hold on.
This below code snippet is nothing but read operation which will –
- read all the data from database
- send all the data to templating engine, ejs in ourcase
//read operation which will be passing value to ejs engine
app.get("/data", (req, res) => {
  const allData = "select * from demo123";
  connection.query(allData, (err, rows) => {
    if (err) {
      res.send(err);
    } else {
      // res.json({ rows });
      res.render("read.ejs", { rows });  // redering read.ejs file along with data
    }
  });
});
Create a folder name “views” and file name “read.ejs” (path : crud-app/server/views/read.ejs)
read.ejs
<!DOCTYPE html>
<html lang="en">
  <head>
    <meta charset="UTF-8" />
    <meta http-equiv="X-UA-Compatible" content="IE=edge" />
    <meta name="viewport" content="width=device-width, initial-scale=1.0" />
    <link
      href="https://cdn.jsdelivr.net/npm/bootstrap@5.2.0/dist/css/bootstrap.min.css"
      rel="stylesheet"
      integrity="sha384-gH2yIJqKdNHPEq0n4Mqa/HGKIhSkIHeL5AyhkYV8i59U5AR6csBvApHHNl/vI1Bx"
      crossorigin="anonymous"
    />

    <link rel="stylesheet" type="text/css" href="style.css" />
    <title>Document</title>
  </head>
  <body>
    <div class="container">
      <h1 class="h3 text-center">All data</h1>
      <div class="row">
        <% if(rows.length > 0) { %> <% rows.map((eachData) => { %>
        <div class="col-md-3 col-sm-12 mx-1">
          <div class="card" style="width: 18rem">
            <div class="card-body">
              <h5 class="card-title"><%- eachData.name %></h5>
              <h6 class="card-subtitle mb-2 text-muted">
                <%- eachData.email %>
              </h6>
              <a href="#" class="card-link">Edit</a>
              <a href="#" class="card-link">Delete</a>
            </div>
          </div>
        </div>

        <% }) %> <%} else { %>
        <div class="col-md-12">
          <h1 class="h2 text-center">No data found</h1>
        </div>

        <% }%>
      </div>
    </div>
  </body>
</html>
Updating server.js file
const express = require("express"); //express package initiated
const app = express(); // express instance has been created and will be access by app variable
const cors = require("cors");
const dotenv = require("dotenv");
var bodyParser = require("body-parser");
const connection = require("./config/db.js");

dotenv.config();
app.use(bodyParser.urlencoded({ extended: true }));
app.set("view engine", "ejs");
app.use(cors());
app.use(express.json());
app.use(express.static(__dirname + "/public"));
app.use(express.static(__dirname + "/views"));


app.get("/", (req, res) => {
  res.redirect("/index1.html");
});

//read
app.get("/data", (req, res) => {
  const allData = "select * from demo123";
  connection.query(allData, (err, rows) => {
    if (err) {
      res.send(err);
    } else {
      // res.json({ rows });
      res.render("read.ejs", { rows });
    }
  });
});

//create
app.post("/create", (req, res) => {
  console.log(req.body.name);
  var name = req.body.name;
  var email = req.body.email;
  try {
    connection.query(
      "INSERT into demo123 (name,email) values(?,?)",
      [name, email],
      function (err, result) {
        if (err) {
          console.log(err);
        } else {
          // res.json({ result });
          res.redirect("/data");
        }
      }
    );
  } catch (err) {
    res.send(err);
  }
});

app.listen(process.env.PORT || 3000, function (err) {
  if (err) console.log(err);
  console.log(`listening to port ${process.env.PORT}`);
});
Step 8 – Delete Operation
Let’s first add a delete link to our delete button on UI
read.ejs (updated):
<!DOCTYPE html>
<html lang="en">
  <head>
    <meta charset="UTF-8" />
    <meta http-equiv="X-UA-Compatible" content="IE=edge" />
    <meta name="viewport" content="width=device-width, initial-scale=1.0" />
    <link
      href="https://cdn.jsdelivr.net/npm/bootstrap@5.2.0/dist/css/bootstrap.min.css"
      rel="stylesheet"
      integrity="sha384-gH2yIJqKdNHPEq0n4Mqa/HGKIhSkIHeL5AyhkYV8i59U5AR6csBvApHHNl/vI1Bx"
      crossorigin="anonymous"
    />

    <link rel="stylesheet" type="text/css" href="style.css" />
    <title>Document</title>
  </head>
  <body>
    <div class="container">
      <h1 class="h3 text-center">All data</h1>
      <div class="row">
        <% if(rows.length > 0) { %> <% rows.map((eachData) => { %>

        <div class="col-md-3 col-sm-12 mx-1">
          <div class="card" style="width: 18rem">
            <div class="card-body">
              <h5 class="card-title"><%- eachData.name %></h5>
              <h6 class="card-subtitle mb-2 text-muted">
                <%- eachData.email %>
              </h6>
              <a href="#" class="card-link">Edit</a>
              <a href="/delete-data?id=<%- eachData.ID %>" class="card-link"    //delete link added
                >Delete</a
              >
            </div>
          </div>
        </div>

        <% }) %> <%} else { %>
        <div class="col-md-12">
          <h1 class="h2 text-center">No data found</h1>
        </div>

        <% }%>
      </div>
    </div>
  </body>
</html>
Now lets create a router for this and remove it from data base
//delete
app.get("/delete-data", (req, res) => {
  const deleteData = "delete from demo123 where id=?";
  connection.query(deleteData, [req.query.id], (err, rows) => {
    if (err) {
      res.send(err);
    } else {
      res.redirect("/data");
    }
  });
});
server.js updated
const express = require("express"); //express package initiated
const app = express(); // express instance has been created and will be access by app variable
const cors = require("cors");
const dotenv = require("dotenv");
var bodyParser = require("body-parser");
const connection = require("./config/db.js");

dotenv.config();
app.use(bodyParser.urlencoded({ extended: true }));
app.set("view engine", "ejs");
app.use(cors());
app.use(express.json());
app.use(express.static(__dirname + "/public"));
app.use(express.static(__dirname + "/views"));

app.get("/", (req, res) => {
  res.redirect("/index1.html");
});

//read
app.get("/data", (req, res) => {
  const allData = "select * from demo123";
  connection.query(allData, (err, rows) => {
    if (err) {
      res.send(err);
    } else {
      // res.json({ rows });
      res.render("read.ejs", { rows });
    }
  });
});

//create
app.post("/create", (req, res) => {
  var name = req.body.name;
  var email = req.body.email;
  try {
    connection.query(
      "INSERT into demo123 (name,email) values(?,?)",
      [name, email],
      function (err, result) {
        if (err) {
          console.log(err);
        } else {
          // res.json({ result });
          res.redirect("/data");
        }
      }
    );
  } catch (err) {
    res.send(err);
  }
});

//delete
app.get("/delete-data", (req, res) => {
  const deleteData = "delete from demo123 where id=?";
  connection.query(deleteData, [req.query.id], (err, rows) => {
    if (err) {
      res.send(err);
    } else {
      res.redirect("/data");
    }
  });
});

app.listen(process.env.PORT || 3000, function (err) {
  if (err) console.log(err);
  console.log(`listening to port ${process.env.PORT}`);
});
Step 9 – Update Operation
Now, update operation is quite tricky and important, so read it nicely.
1. Adding link to the Update button
read.ejs (updated)-
<!DOCTYPE html>
<html lang="en">
  <head>
    <meta charset="UTF-8" />
    <meta http-equiv="X-UA-Compatible" content="IE=edge" />
    <meta name="viewport" content="width=device-width, initial-scale=1.0" />
    <link
      href="https://cdn.jsdelivr.net/npm/bootstrap@5.2.0/dist/css/bootstrap.min.css"
      rel="stylesheet"
      integrity="sha384-gH2yIJqKdNHPEq0n4Mqa/HGKIhSkIHeL5AyhkYV8i59U5AR6csBvApHHNl/vI1Bx"
      crossorigin="anonymous"
    />

    <link rel="stylesheet" type="text/css" href="style.css" />
    <title>Document</title>
  </head>
  <body>
    <div class="container">
      <h1 class="h3 text-center">All data</h1>
      <div class="row">
        <% if(rows.length > 0) { %> <% rows.map((eachData) => { %>

        <div class="col-md-3 col-sm-12 mx-1">
          <div class="card" style="width: 18rem">
            <div class="card-body">
              <h5 class="card-title"><%- eachData.name %></h5>
              <h6 class="card-subtitle mb-2 text-muted">
                <%- eachData.email %>
              </h6>
              <a href="/update-data?id=<%- eachData.ID %>" class="card-link"    //edit button link added
                >Edit</a
              >
              <a href="/delete-data?id=<%- eachData.ID %>" class="card-link"
                >Delete</a
              >
            </div>
          </div>
        </div>

        <% }) %> <%} else { %>
        <div class="col-md-12">
          <h1 class="h2 text-center">No data found</h1>
        </div>

        <% }%>
      </div>
    </div>
  </body>
</html>
2. Passing data to update router and redirecting to the Update the page
Once user clicks on the update button , it should redirect use to an update page, and also the input field should be pre-filled with the data. For this, we need to hit the router which will bring the data of that particular field and populate the UI
adding in server.js
//passing data to update page
app.get("/update-data", (req, res) => {
  const updateData = "select * from  demo123 where id=?";
  connection.query(updateData, req.query.id, (err, eachRow) => {
    if (err) {
      res.send(err);
    } else {
      console.log(eachRow[0]);
      result = JSON.parse(JSON.stringify(eachRow[0]));  //in case if it dint work
      res.render("edit.ejs", { data: eachRow[0] });
    }
  });
});
Edit.ejs
<!DOCTYPE html>
<html lang="en">
  <head>
    <meta charset="UTF-8" />
    <meta http-equiv="X-UA-Compatible" content="IE=edge" />
    <meta name="viewport" content="width=device-width, initial-scale=1.0" />
    <link
      href="https://cdn.jsdelivr.net/npm/bootstrap@5.2.0/dist/css/bootstrap.min.css"
      rel="stylesheet"
      integrity="sha384-gH2yIJqKdNHPEq0n4Mqa/HGKIhSkIHeL5AyhkYV8i59U5AR6csBvApHHNl/vI1Bx"
      crossorigin="anonymous"
    />
    <link rel="stylesheet" href="style.css" />
    <title>Document</title>
  </head>
  <body>
    <div class="container my-2">
      <h1 class="h1 text-center">Update Data</h1>

      <!-- hittng the /create router -->
      <form id="myForm" action="http://localhost:4000/update" method="post">
        <input type="hidden" value="<%=data.ID %>" name="hidden_id" />
        <div class="mb-3">
          <label class="form-label">Name</label>
          <input
            type="text"
            class="form-control"
            value="<%=data.name %>"
            name="name"
          />
        </div>
        <div class="mb-3">
          <label class="form-label">Email address</label>
          <input
            type="email"
            class="form-control"
            value="<%=data.email %>"
            name="email"
          />
        </div>

        <button type="submit" class="btn btn-primary">Update</button>

        <input
          class="btn btn-outline-dark"
          type="button"
          value="No, go back!"
          onclick="history.go(-1)"
        />
      </form>
    </div>
  </body>
</html>
3. Updating the database and redirecting users to the main page
adding in server.js
//final update
app.post("/update", (req, res) => {
  const id_data = req.body.hidden_id;
  const name_data = req.body.name;
  const email_data = req.body.email;

  console.log("id...", req.body.name, id_data);

  const updateQuery = "update demo123 set name=?, email=? where id=?";

  connection.query(
    updateQuery,
    [name_data, email_data, id_data],
    (err, rows) => {
      if (err) {
        res.send(err);
      } else {
        res.redirect("/data");
      }
    }
  );
});
Conclusion
And with this we have come to the end of our article.
Hope you guys love it.
[…] I have written an article on CRUD operation using node js and you guys loved it. But frankly that was only for learning purpose, because in real application […]
thank you so much, now my basic understanding is clear.
now please help me how to deploy this to my cPanel host.
Thank you for the good lesson.
thank you so much, now my basic understanding is clear.
now please help me how to deploy this to my react app.