Redux Toolkit Tutorial
Redux Toolkit Tutorial
A practical walkthrough of using Redux Toolkit with React, built around a simple counter app.
What is "state" in React?
State is the built-in mechanism React components use to hold data that belongs to them and can change over time.
Why use Redux?
Redux centralizes your app's state in one place, which makes changes to that state more predictable and easier to trace as the app grows.
What problem does it actually solve?
- Redux provides a single, global store of state.
- It isn't something every project needs — plenty of apps get by fine without it.
- It becomes useful mainly when you're trying to avoid prop drilling (passing data down through many layers of components that don't need it themselves).
- A simple mental model: it behaves like React's own state, except it's reachable from anywhere in the app rather than being scoped to one component.
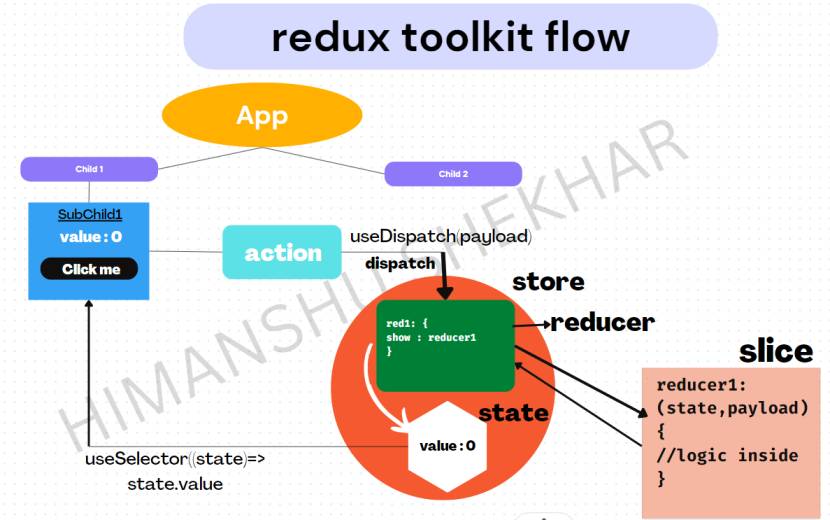
Building a Redux counter app
Step 1 — Install the packages
Only two packages are needed:
npm install --save react-redux @reduxjs/toolkit
Step 2 — Create the global store
src/app/store.js:
import { configureStore } from "@reduxjs/toolkit";

export const store = configureStore({
  reducer: {},
});
configureStore takes a single configuration object instead of several separate arguments. Behind the scenes it already wires up Redux DevTools support and sensible default middleware for you.
Step 3 — Provide the store to the whole app
src/index.js:
import React from "react";
import ReactDOM from "react-dom/client";
import "./index.css";
import App from "./App";
import { store } from "./app/store";
import { Provider } from "react-redux";

const root = ReactDOM.createRoot(document.getElementById("root"));
root.render(
  <Provider store={store}>
    <App />
  </Provider>
);
Wrapping App in Provider makes the store accessible anywhere in the component tree. At this point you should also be able to see the store show up in the Redux DevTools browser extension.
Step 4 — Create a slice
A "slice" is created with createSlice, which takes an initial state, a set of reducer functions, and a name — and from those, it automatically generates the matching action creators and action types for you. Under the hood it relies on createAction and createReducer, and uses Immer internally, which is why you can write reducer logic that looks like it's mutating state directly even though it isn't.
src/features/counter/counterSlice.js:
import { createSlice } from "@reduxjs/toolkit";

const initialState = { value: 0 };

export const counterSlice = createSlice({
  name: "counter",
  initialState,
  reducers: {
    increment: (state) => {
      state.value += 1;
    },
    decrement: (state) => {
      state.value -= 1;
    },
    incrementByValue: (state, action) => {
      state.value += action.payload;
    },
  },
});

export const { increment, decrement, incrementByValue } = counterSlice.actions;

export default counterSlice.reducer;
Step 5 — Wire the slice's reducer into the store
import { configureStore } from "@reduxjs/toolkit";
import counterReducer from "../features/counter/counterSlice";

export const store = configureStore({
  reducer: { counter: counterReducer },
});
Step 6 — Read and dispatch from a component
components/Counter.js:
import React from "react";
import { useSelector, useDispatch } from "react-redux";
import { decrement, increment } from "../features/counter/counterSlice";

export default function Counter() {
  const count = useSelector((state) => state.counter.value);
  const dispatch = useDispatch();

  return (
    <div
      style={{
        display: "flex",
        flexDirection: "column",
        justifyContent: "center",
        width: "40%",
        alignItems: "center",
      }}
    >
      <button onClick={() => dispatch(increment())}>Increment</button>
      <span>{count}</span>
      <button onClick={() => dispatch(decrement())}>Decrement</button>
    </div>
  );
}
useSelector reads a piece of state out of the store, and useDispatch gives you a function to fire off actions that the slice's reducers will handle.
Wrapping up
Redux is less about deeply understanding every internal mechanism and more about following a consistent flow: clicking a button dispatches an action, that action is handled by a reducer function containing the actual logic, and the reducer updates the relevant slice of the store — which then flows back down to any component subscribed to it via useSelector.
Quick recap of the steps:
- Install redux and react-redux (via Redux Toolkit).
- Create a store.
- Provide the store globally with <Provider>.
- Create slices — this is where the actual state-update logic lives.
- Trigger updates from the UI with useDispatch, and read state back with useSelector.